Have you ever seen a photograph of a flower that seemed to glow from within? It’s not just about the flower’s beauty, but about the light that reveals it. The single most powerful tool in outdoor flower photography isn’t your camera or your lens—it’s the sun. Understanding how to use natural light, in all its forms, is what separates a simple snapshot from a breathtaking image. It’s the difference between a flat, lifeless petal and one that shows every delicate vein and texture. Learning to see and interpret light is the key to unlocking the true potential of your flower photography.
Hello, I’m Mhd Zain. For the past several years, my fascination with flowers has taken me from my own garden to wild meadows, always with a camera in hand. I’m not a formally trained botanist, but a passionate observer who loves to blend the art of photography with the science of the natural world. My goal has always been to understand why certain photos work and others don’t, and the answer almost always comes back to light. This article is a collection of what I’ve learned by spending countless hours outside, watching how the changing light interacts with the blooms, and I’m excited to share these practical insights with you.
The Language of Light: Your Most Important Creative Tool
Before we dive into specific times of day, let’s break down what we mean by “light.” Light isn’t just about making things visible; it’s the primary force that dictates the mood, dimension, texture, and color in your photographs. Think of light as your paintbrush. You can use it to create soft, dreamy portraits or bold, dramatic scenes. The quality and direction of light will completely transform the same flower.
The three main properties of light that we, as photographers, need to understand are:
- Quality (Hard vs. Soft): This is the most crucial concept. Hard light, like the direct sun at noon, creates sharp, well-defined shadows and high contrast. Soft light, like on an overcast day, creates gentle, diffused shadows (or no shadows at all) and low contrast. For flowers, soft light is often preferred because it reveals subtle details without creating distracting dark areas.
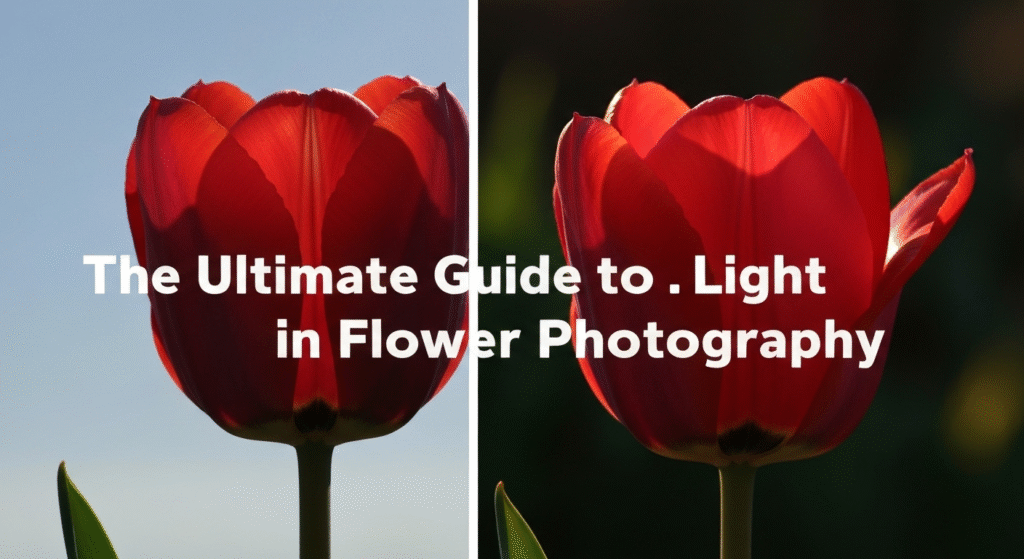
- Direction: Where is the light coming from? Is it in front of your flower (front lighting), to the side (sidelighting), or behind it (backlighting)? Each direction produces a dramatically different result. Sidelighting is excellent for revealing texture, while backlighting can make petals translucent and ethereal.
- Color Temperature: Light also has color, measured in Kelvin (K). The warm, yellow-orange glow of sunrise is a low color temperature, while the cool, blue tone of twilight is a high color temperature. This “color” of the light sets the entire mood of your image.
Understanding these fundamentals is the first step. Now, let’s see how they play out in real-world conditions.
The Golden Hour: Nature’s Perfect Spotlight
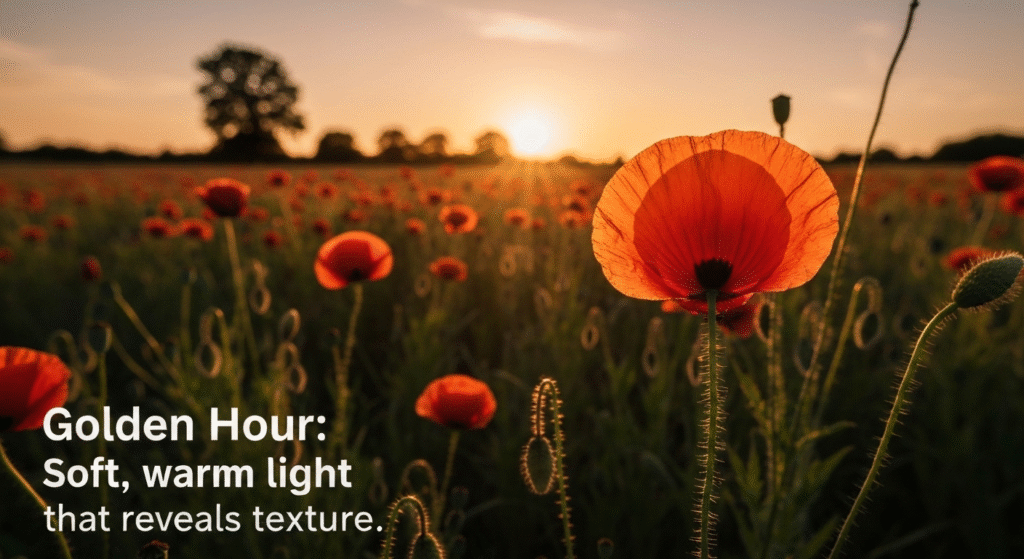
If you ask any outdoor photographer about their favorite time to shoot, they will almost certainly mention the golden hour. This magical period occurs shortly after sunrise and shortly before sunset when the sun is low in the sky. During this time, the sunlight has to travel through more of the Earth’s atmosphere, which diffuses it, softens it, and gives it a characteristic warm, golden hue.
Why the Golden Hour is Ideal for Flowers
During the golden hour, the light is both soft and directional. This is the perfect combination for flower photography. The softness ensures that you don’t get harsh, ugly shadows that hide detail. At the same time, the low angle of the sun creates long, gentle shadows that gracefully define the shape and texture of the petals and leaves. This is something you simply cannot replicate at midday.
I remember one evening I was trying to photograph a field of black-eyed susans. The light was hitting them from the side, and it was incredible. Each petal cast a soft, delicate shadow onto the one below it, giving the flower heads a three-dimensional quality they completely lacked hours earlier. The warm light also intensified their yellow petals, making the entire scene feel vibrant and alive. That experience taught me that timing isn’t just a suggestion; it’s a creative choice.
Practical Tips for Shooting in the Golden Hour
- Plan Ahead: The golden hour is fleeting, often lasting less than an hour. Use an app or check a weather site to know the exact sunrise and sunset times for your location. The U.S. National Oceanic and Atmospheric Administration (NOAA) has a Solar Calculator that can help you plan.
- Use Sidelighting: Position yourself so the sun is hitting your flower from the side. This is the best way to emphasize the delicate textures of the petals.
- Look for Backlighting: We’ll cover this more later, but the golden hour is the perfect time for backlighting, which can make your flower subjects glow.
- Bring a Tripod: Because the light is less intense, you may need a slower shutter speed to get a proper exposure. A tripod will keep your camera steady and ensure your photos are sharp.
| Feature | Golden Hour Light | Midday Light |
| Quality | Soft and diffused | Hard and direct |
| Direction | Low, horizontal angle | High, overhead angle |
| Color | Warm (yellow, orange, red) | Neutral or slightly cool |
| Shadows | Long, soft, and gentle | Short, dark, and harsh |
| Best For | Revealing texture, creating mood, warm tones | Creating high contrast, graphic shapes |
The Overcast Day Advantage: Nature’s Giant Softbox

It might seem counterintuitive, but a bright, sunny day is often the worst time for flower photography. Many of my most successful and vibrant flower photos were taken under a blanket of white or gray clouds. Here’s the thing: an overcast sky acts like a gigantic softbox, the kind a studio photographer pays hundreds of dollars for. The clouds take the single, harsh point of light from the sun and scatter it evenly across the landscape.
Unlocking Rich Colors and Fine Details
This diffused, non-directional light has two major benefits. First, it eliminates harsh shadows. You can photograph the most complex flower, like a peony with its hundreds of petals, and the light will fall evenly on all of them. There are no deep, black voids hiding the flower’s structure.
Second, soft light saturates colors. Without the glare of direct sun washing everything out, the true colors of the flower—the deep reds, the vibrant purples, the brilliant yellows—can shine through. This effect is even more pronounced after a light rain when petals are covered in water droplets. On a sunny day, those droplets would create distracting specular highlights (bright, star-like glints of light). On an overcast day, each droplet becomes a perfectly defined little jewel, adding texture and interest to your photo.
For example, I once stumbled upon a patch of wild irises on a misty, gray morning. The purple of their petals was so rich and deep it was almost velvety. Because of the soft, even light, I was able to capture the intricate yellow and white patterns deep within the bloom without any part of the image being too bright or too dark.
Things to Consider on a Cloudy Day
- Watch Your Background: The main drawback of an overcast day is that the sky itself can be a boring, flat white or gray. Try to compose your shot to minimize how much sky is visible. Get low to the ground and shoot upwards at the flower against a backdrop of trees, or get closer to fill the frame with the flower itself.
- Boost the Vibrancy (Slightly): Sometimes, photos taken in overcast light can look a little flat straight out of the camera. A small, simple adjustment to contrast or vibrance in post-processing can often bring them to life.
Navigating Harsh Midday Sun: A Challenge, Not a Dealbreaker
We’ve all been there: you find a perfect flower, but it’s the middle of the afternoon and the sun is beating down directly from above. This is widely considered the most challenging light for photography. The overhead sun creates high contrast, with extremely bright highlights on the tops of petals and deep, dark shadows underneath. This can make a flower look harsh and can trick your camera’s meter, leading to an incorrect exposure.
But you don’t always have to pack up your camera and go home. With a few tricks, you can still get great shots.
Finding or Creating Soft Light
Your mission in midday is to turn that hard light into soft light.
- Seek Open Shade: The easiest solution is to find a flower that’s already in the shade. The shade from a large tree, a building, or even a hill acts as a natural diffuser. The light in “open shade” is soft and even, similar to an overcast day, but often with a cooler, bluer tone.
- Use a Diffuser: This is one of the most valuable and inexpensive tools a flower photographer can own. A diffuser is a piece of translucent fabric stretched over a collapsible frame. By holding it between the sun and the flower, you can instantly soften the harsh light, creating a beautiful, gentle illumination. I carry a small, 24-inch 5-in-1 reflector/diffuser in my camera bag at all times for this very purpose.
- Use Your Own Shadow: In a pinch, you can even use your own body to cast a shadow over a small flower. Just be careful not to get your own shadow in the photo!
Embracing the Contrast
Alternatively, you can lean into the harshness of the light for creative effect. High-contrast light is excellent for creating bold, graphic, and abstract images. You can focus on the strong lines and shapes created by the shadows. Or, you can experiment with a “high-key” look by intentionally overexposing the image to blow out the background, isolating the flower against a pure white canvas.
| Pros of Midday Shooting | Cons of Midday Shooting |
| Light is abundant (allows for fast shutter speeds) | Creates harsh, deep shadows |
| Can be used for dramatic, high-contrast images | Highlights are easily “blown out” (loss of detail) |
| Sharp details are visible in well-lit areas | Colors can appear washed out and less saturated |
| Difficult to get an even exposure |
The Art of Backlighting: How to Make Flowers Glow
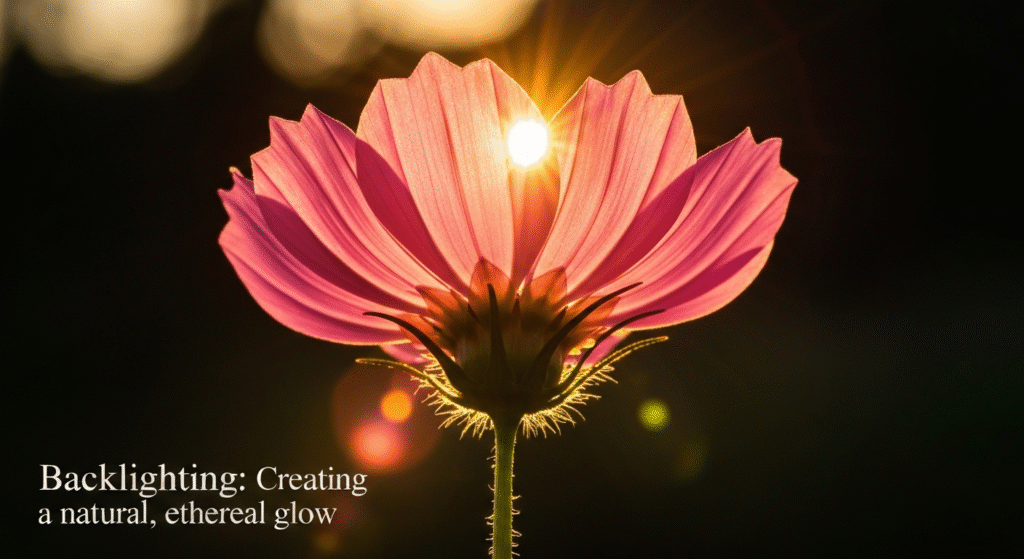
Backlighting is a technique where the main light source (the sun) is behind your subject. This might sound like it would create a silhouette, and it can, but when used correctly on flowers, it produces a truly magical effect. When the light shines through the petals, it makes them appear translucent and gives them a radiant glow, as if they are lit from within.
This technique is especially effective for:
- Flowers with thin or delicate petals (like poppies, cosmos, or tulips).
- Plants with fuzzy stems or leaves (like lamb’s ear or mullein), as it creates a beautiful “rim light” around the edges.
- Capturing the intricate web of veins within a leaf or petal.
I have a particular love for backlighting poppies in the late afternoon. The sun, low in the sky, hits the back of their paper-thin red petals, turning them into glowing embers. It reveals a level of detail and color that is completely hidden when the flower is lit from the front.
Tips for Mastering Backlighting
- Meter Carefully: Your camera’s meter can be easily fooled by the bright light source in the background. It will try to darken the whole scene, leaving your flower underexposed. Use spot metering mode and take a meter reading directly from the flower’s petal to ensure it is properly exposed.
- Use a Lens Hood: Shooting towards the sun can cause lens flare (unwanted streaks and circles of light in your image). A lens hood helps to block this stray light. Of course, you can also use flare creatively for an artistic, dreamy effect.
- Choose Your Background: The background in a backlit shot will often be very bright. You can use this to your advantage by positioning the flower against a darker, shaded area. This contrast will make the glowing rim light on your subject really pop.
Frequently Asked Questions (FAQs)
What is the single best time of day for flower photography?
While the golden hour (just after sunrise or before sunset) is often considered ideal for its warm, soft, and dimensional light, the best time truly depends on the look you want. Overcast days are fantastic for rich, saturated colors and fine details.
Can I take good flower photos on a very sunny day?
Yes, but you need to manage the light. The best strategies are to find flowers in open shade or to use a diffuser to soften the direct sun. This will prevent harsh shadows and washed-out colors.
Do I need expensive equipment to control natural light?
Not at all. The most useful tool is a simple, collapsible 5-in-1 reflector, which includes a diffuser. They are inexpensive and can make a huge difference. Otherwise, all you need is an understanding of light and the patience to shoot at the right time of day.
How does changing my position affect the lighting?
Dramatically. Simply walking around a flower can change the lighting from front lighting (flat), to sidelighting (textured), to backlighting (glowing). Always move around your subject to see how the light interacts with it from different angles before taking a picture.
Conclusion
Light is the soul of photography. By moving beyond just looking at the flower and starting to truly see the light that falls upon it, you will fundamentally change your approach to capturing its beauty. Don’t be afraid of “bad” weather; an overcast sky can be your best friend. Don’t dismiss the midday sun; see it as a challenge to be creative. Get out there during the fleeting moments of the golden hour and watch the world transform. The more you practice observing and understanding light, the more intentional and impactful your flower photography will become.