Have you ever stopped to truly look at a flower? Not just a glance at its color in a garden bed, but a deep, curious look. When you get close, a simple petal can reveal intricate textures, a stamen holds impossibly fine grains of pollen, and a single dewdrop becomes a crystal ball reflecting the world. Capturing this hidden universe is the magic of macro photography. It transforms the familiar into something extraordinary, showing us details that our eyes normally miss.
Hello, I’m Mhd Zain. For over five years, my fascination with flowers has drawn me closer, first as a gardener and then with a camera in hand. I’m not a professional botanist, but my passion lies in exploring the intersection of nature’s art and the science of photography. My journey has been one of trial, error, and immense discovery, learning how different lenses and settings can either hide or reveal a flower’s true character. This guide is built on that hands-on experience, designed to help you bypass some of the early frustrations and jump straight into the joy of capturing the stunning, miniature worlds inside every bloom.
What Exactly Is Macro Photography?
Before we dive into the equipment and settings, let’s clear up what “macro” really means. In photography, macro refers to capturing images of small subjects at a magnification ratio of at least 1:1.
What does 1:1 magnification mean? It’s simple. It means the size of the subject’s image projected onto the camera’s sensor is the same as the subject’s actual size in real life. If you are photographing a 15mm ladybug, its image will take up 15mm of space on your camera’s sensor. This is what allows for those stunning, life-sized (or even larger-than-life) prints of tiny details. Anything less than 1:1 is technically considered “close-up” photography, but the term “macro” is often used more broadly. For our purposes, we’re focused on getting as close as possible to reveal a flower’s hidden beauty.
This ability to reproduce a subject at its true size is the key that unlocks the incredible detail in flower photography—from the velvety texture of a rose petal to the delicate veins on a leaf.
Essential Equipment for Macro Flower Photography
While you can start with almost any camera, getting those jaw-dropping macro shots is much easier with the right gear. Let’s break down the essential components, from the camera body to the specialized lenses that make it all possible.
Choosing the Right Camera
The good news is that you don’t need the most expensive camera on the market. Most modern DSLR and mirrorless cameras are more than capable of producing beautiful macro images. The real difference comes down to the lens you use.
- DSLR (Digital Single-Lens Reflex): These have been the workhorses for years. They offer a huge range of compatible macro lenses and accessories. Their optical viewfinders are great for seeing the world without any digital lag.
- Mirrorless: These are typically lighter and more compact than DSLRs, which is a big plus when you’re hiking to find wildflowers. A key advantage for macro work is the electronic viewfinder (EVF) and features like focus peaking, which visually highlights the sharpest parts of your image—a massive help for nailing focus on tiny details.
From my experience, the choice between DSLR and mirrorless is more about personal preference and handling. I started with a DSLR but now use a mirrorless camera for its lighter weight and helpful focus aids. The key is to have a camera that allows you to change lenses and manually control your settings.
The Heart of Macro: Lenses and Accessories
This is where the magic truly happens. Your lens determines how close you can get and how much magnification you can achieve. Here are the most common options, from dedicated lenses to budget-friendly alternatives.
True Macro Lenses
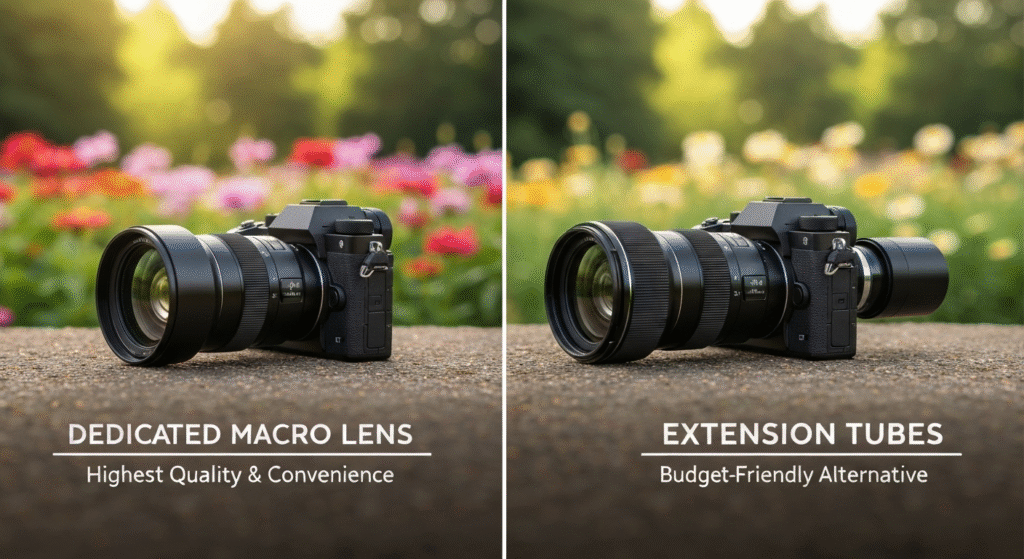
A dedicated macro lens is the gold standard. These lenses are specifically designed to perform well at very close focusing distances and achieve that true 1:1 magnification without any extra accessories. They are optically optimized for sharpness and clarity in close-up situations.
Macro lenses come in different focal lengths, and the one you choose affects your working distance—the space between the front of your lens and your subject.
- Short Focal Length (35mm-60mm): These require you to get very close to the flower. This can be a problem as you might cast a shadow on your subject or scare away any insects. They are often more compact and affordable.
- Medium Focal Length (90mm-105mm): This is the sweet spot for many flower photographers. It offers a comfortable working distance, allowing you to light your subject easily without being right on top of it. I find my 100mm macro to be the most versatile lens in my bag.
- Long Focal Length (150mm-200mm): These give you the most working distance, which is excellent for photographing shy insects on flowers or reaching blooms in awkward spots. However, they are typically larger, heavier, and more expensive.
Budget-Friendly Macro Alternatives
If you’re not ready to invest in a dedicated macro lens, there are several accessories that can adapt your existing lenses for close-up work.
- Extension Tubes: These are hollow tubes that fit between your camera body and your lens. They move the lens farther from the sensor, which reduces its minimum focusing distance and increases magnification. They contain no glass, so they don’t degrade your image quality. The main drawback is that you lose the ability to focus on distant objects (infinity focus) with the tube attached.
- Close-Up Filters (or Diodopters): These look like magnifying glasses that screw onto the front of your lens. They are the easiest and cheapest way to get started. While convenient, they add another layer of glass that can sometimes soften the image or introduce color fringing, especially with cheaper models.
- Reverse Rings: This is an inexpensive adapter that lets you mount your lens on your camera backward. A standard 50mm lens, when reversed, can become a surprisingly effective macro lens. It’s a bit of a DIY solution and can be tricky to use, as you often lose automatic control over aperture and focus.
Here’s a comparison to help you decide:
| Method | Pros | Cons | Best For |
| True Macro Lens | Highest image quality, 1:1 magnification, easy to use, retains infinity focus. | Most expensive option. | Photographers serious about macro who want the best results and convenience. |
| Extension Tubes | Excellent image quality (no glass), relatively inexpensive. | Loses infinity focus, can reduce light reaching the sensor. | Hobbyists with prime lenses who want high-quality results without buying a new lens. |
| Close-Up Filters | Very affordable, easy to use, retains autofocus and aperture control. | Can reduce image sharpness, especially at the edges. | Beginners on a tight budget who want to experiment with close-up photography. |
| Reverse Rings | Extremely cheap, can provide high magnification. | Loses all automatic controls, exposes the rear of the lens to dust. | Experimental photographers and those who enjoy a DIY challenge. |
Stabilizing Your Shot: Tripods and Remote Shutters
When you’re working with high magnification, even the slightest camera movement is exaggerated and can result in a blurry photo. A sturdy tripod is arguably one of the most important accessories for sharp macro shots.
I learned this the hard way. Early on, I’d try to handhold my shots in what I thought was perfect light, only to find them slightly soft when viewed on a computer. Using a tripod forces you to slow down, perfect your composition, and ensures your camera is perfectly still. To be even safer, use a remote shutter release or your camera’s built-in 2-second timer. This prevents you from causing vibrations when you press the shutter button.
Core Camera Settings for Stunning Flower Macros
Having the right gear is only half the battle. Understanding how to set your camera is crucial for turning a simple snapshot into a work of art. These three settings—aperture, shutter speed, and ISO—work together in what is known as the exposure triangle.
Aperture and Depth of Field (The Creative Control)
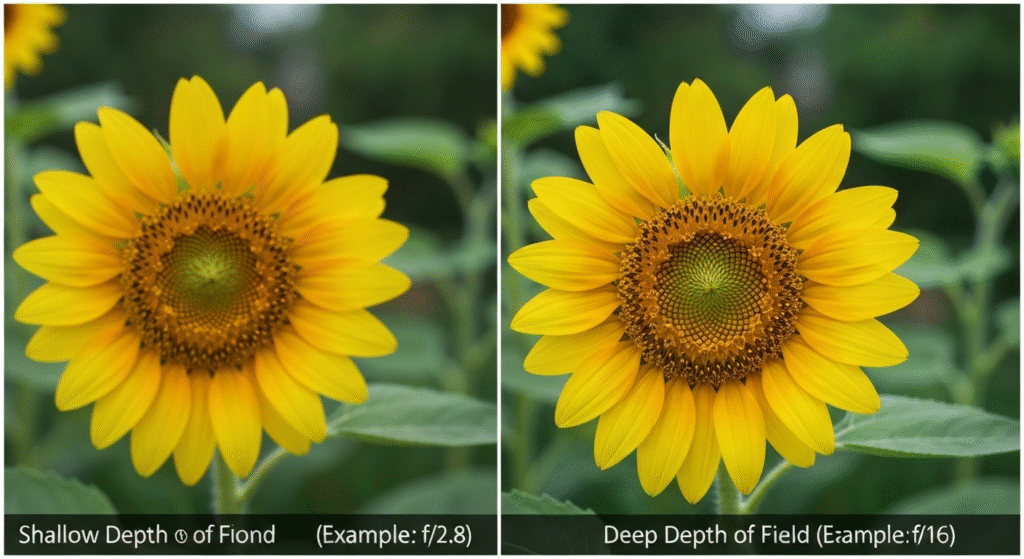
Aperture (measured in f-stops like f/2.8, f/8, f/16) controls how much of your image is in focus. This is known as Depth of Field (DOF). In macro photography, DOF is incredibly shallow.
- Wide Aperture (e.g., f/2.8 – f/5.6): This creates a very thin slice of focus. It’s perfect for isolating a single part of a flower—like the stamen—and letting the foreground and background blur into a beautiful, creamy wash of color. This is a very artistic and popular look.
- Narrow Aperture (e.g., f/11 – f/22): This increases the depth of field, bringing more of the flower into sharp focus from front to back. This is more of a documentary style, useful when you want to show the entire structure of a bloom in detail. Be careful not to go too narrow (e.g., past f/16 on some cameras), as you can lose sharpness due to an optical effect called diffraction.
I often start at around f/8 and adjust based on the look I want. For a soft, dreamy portrait of a daisy, I’ll open up to f/4. For a detailed shot of a complex orchid, I’ll close down to f/11 or f/13.
Shutter Speed: Freezing Motion
Shutter speed determines how long the camera’s sensor is exposed to light. For macro, its main job is to prevent blur—either from camera shake or the flower moving in the wind.
- If you’re using a tripod, you can use a slower shutter speed without worrying about camera shake.
- If you’re handholding or if it’s windy, you’ll need a faster shutter speed (e.g., 1/250s or higher) to freeze the motion and get a sharp shot. Raising your ISO can help you achieve a faster shutter speed if the light is low.
ISO: Balancing Light and Noise
ISO measures your camera sensor’s sensitivity to light.
- Low ISO (100-200): Always try to use the lowest ISO possible. This will give you the cleanest image with the most detail and least amount of digital noise (graininess).
- High ISO (800 and up): You may need to increase your ISO to get a fast enough shutter speed in low light or when handholding. Modern cameras handle high ISOs well, but it’s always a trade-off between getting a sharp shot and introducing noise.
Focusing: The Decisive Moment
Precise focus is everything in macro. Because the depth of field is so shallow, being off by even a millimeter can mean the difference between a stunning shot and a reject.
- Manual Focus: Most macro photographers prefer manual focus. It gives you absolute control to pinpoint the exact part of the flower you want to be sharpest.
- Live View + Magnification: Use your camera’s LCD screen (Live View mode) and magnify the view 5x or 10x. This lets you see the fine details and manually adjust the focus with incredible precision.
- Focus Peaking: If your camera has it, this feature will overlay a color (like red or yellow) on the in-focus areas of your screen, making it very easy to see what’s sharp.
Common Challenges and Solutions
Macro flower photography comes with its own set of challenges. Here are a few I’ve run into time and again, along with the solutions that work for me.
| Problem | Common Cause(s) | Solution(s) |
| Blurry or Soft Images | 1. Camera shake. 2. Subject movement (wind). 3. Missed focus. | 1. Use a sturdy tripod and a remote shutter. 2. Use a faster shutter speed. Shield the flower from wind with your body or a piece of cardboard. 3. Use Live View with magnification and manual focus. |
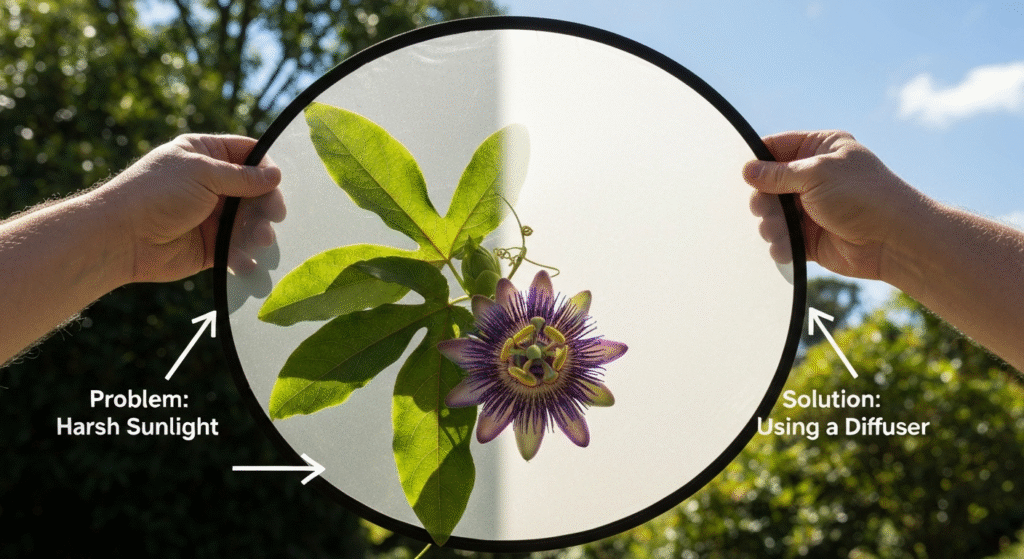
| Harsh Shadows or Blown-Out Highlights | Direct, bright sunlight. | Shoot on overcast days for soft, even light. If it’s sunny, use a diffuser to soften the light or a reflector to fill in shadows. |
| Distracting Background | Clutter behind the flower (twigs, other plants). | Change your shooting angle. Use a wide aperture (like f/4) to blur the background. Place a piece of colored card behind the flower. |
| Entire Flower Isn’t Sharp | Depth of field is too shallow. | Use a narrower aperture (like f/11 or f/16). For ultimate sharpness, learn the “focus stacking” technique. |
Frequently Asked Questions (FAQs)
What is the best time of day for flower photography?
The best light is usually during the “golden hours”—the first hour after sunrise and the last hour before sunset. The light is soft, warm, and creates beautiful long shadows. Overcast days are also fantastic, as the clouds act like a giant softbox, providing even, diffused light that’s perfect for showing off a flower’s color and texture.
Do I need a flash for macro photography?
You don’t need one, but it can be very helpful. A dedicated macro flash (like a ring flash or twin-lite flash) can provide light without creating harsh shadows, allowing you to use a low ISO and a fast shutter speed even in dim conditions. However, learning to work with natural light and a simple reflector is a great starting point.
How do I deal with wind when trying to photograph flowers?
Wind is the biggest enemy of a macro photographer. The best solution is to shoot on calm days. If that’s not possible, try to block the wind with your body or a small reflector. You can also use a small clamp (a Plamp) to gently hold the flower’s stem steady. Alternatively, embrace the motion and use a slightly slower shutter speed for an artistic blur effect.
What is focus stacking?
Focus stacking is an advanced technique where you take multiple photos of the same flower, each focused on a different spot (from front to back). You then merge these photos using special software (like Photoshop or Helicon Focus) to create a single image that is perfectly sharp throughout. It’s the best way to overcome the shallow depth of field limitations in macro.
Conclusion
The art of macro flower photography is a journey of discovery. It invites you to slow down, observe closely, and appreciate the incredible complexity and design hidden in the natural world. While the gear can seem technical and the settings complex, it all comes down to a few key principles: get a lens that can focus close, keep your camera steady, and carefully control your slice of focus with aperture.
Don’t be afraid to experiment. Lie on the ground to get a new angle. Shoot into the sun to see how it backlights the petals. Focus on an “imperfect” flower with a torn leaf or a visiting insect. Every bloom has a story to tell, and with these techniques, you now have the tools to capture and share it. The most important thing is to get out there and start shooting.